In this post I will take you in a journey on creating an automated yet customized open graph image per post for your blog, just like the following one that was created using the basic info from this post automatically and shared as the open graph (OG for short) image for all social media when you share it.

What is an open graph?
Well, since we have social media like Facebook, X (Twitter), Linkedin, …etc, we used these networks in order to promote the content that we create on different blogs or websites, and it became essential to have a nice image, proper text, big font title, shared with the link (just like the thumbnail on Youtube), these information is supposed to be fetched automatically from the shared link.
These are what we call Open Graph metadata, it can be set in any page using meta tags in the header of the page just like the example below:
<meta property="og:title" content={title} />
<meta property="og:description" content={description} />
<meta property="og:image" content={image} />
<meta property="og:type" content={type} />
Why open graph images are important?
In order to catch people’s eyes on social media you always need to care about the shared image with the link, it should be attractive and gives an idea about what is in the link, people like to see big text and some info about time to read or author and so on.
Usually if you didn’t set the og:image yourself, it will depend on the social site to pick one of the images in your shared page, or share the link with some boring text or only an empty card which is not recommended at all.
This is part of the A11y as well, since you are enabling internet users with access to some information even before clicking on the link and make them sure that they really want to read that article or browser that page, for e-commerce it can be a clear image for the product.
Also, X (Twitter) has changed the social card recently to show only the image as a link without any information except a small little title which is not so visible, and it became hard for user to distinguish images from links. So we had to adapt to that by providing the title at least in a big font in the og:image itself.
Satori Library
Vercel 🔗 announced a release of an SVG generator called Satori 🔗, which basically get HTML + CSS and return SVG image, and that is commonly used for creating a custom og images for blogs that holds the title and info about the author and time to read, … etc, as I will explain in this article.
That was possible in the past only by running a headless browser like phantom and get a screenshot of the created card and refer it as
og:imagemeta tag, but that work around was not straight forward.
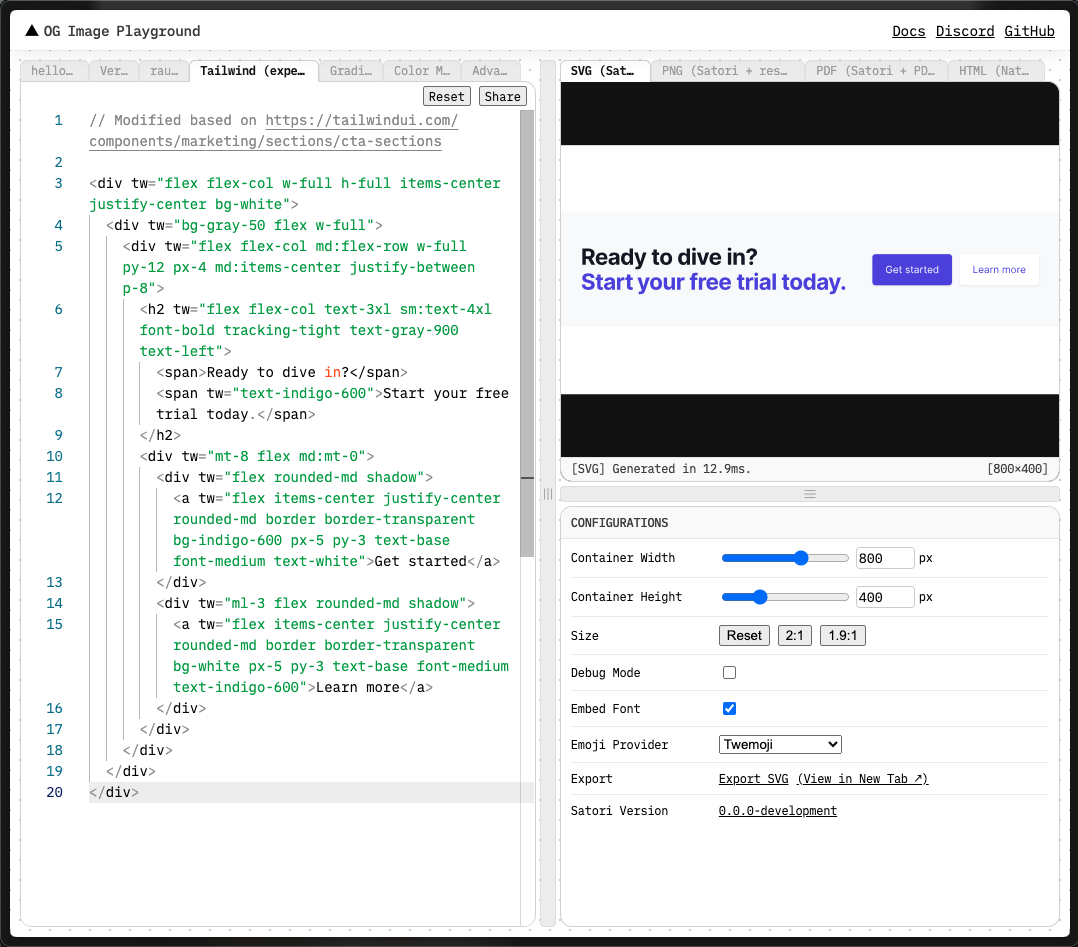
Satori comes with a handy playground as well to try everything before implementing it for real, supports HTML+CSS, gradient colors, emoji’s, and even supports Tailwind experimentally (which I did in order to build it in this blog)
Try it out yourself from here 🔗 and export image
What I don’t like in Satori
It works just like charm however there are some stuff that makes it cumbersome in implementation at first:
- It is not easy to make a custom card since it doesn’t understand the declarative react component, it only accepts the JSX form of a react component.
// JSX form
{
  type: 'button',
  props: {
    children: "click me!",
  }
}

// Declarative form (common)
<button>click me!</button>- Fonts has to be imported explicitly and used in different defined sections (will explain a bit in the example later below).
- It only introduce images in SVG which require us to use a different lib to convert it to a png to be referenced easily as
og:image - more about the capabilities and limitations check it out 🔗
A working example from my blog
I am using Astro + Tailwind to build this blog, but it doesn’t matter what you are using the following techniques would work any way, you need to make sure that you can run the code in a node environment.
1. Setup
First and foremost, you need to set up the lib itself and sharp 🔗 (It is needed to convert the svg image to png)
npm install satori sharp
# or
yarn add satori sharp
2. Create file
Here is how it works, you create a file that runs on the server using nodejs, in my case using astro I created a file under pages directory which is *.ts file and runs on server during the build time (these files in astro is considered a service that run using nodejs)
The following example is real and will return a png image with the size 1200 x 630 as recommended 🔗 for og:images, and the following will generate merely a heading text (Hello world).
import fs from 'fs/promises';
import satori from 'satori';
import sharp from 'sharp';

export const GET = async function get({ params, request }) {
  const robotoFont = await fs.readFile(
    './public/fonts/roboto/Roboto-Regular.ttf'
  );
  const svg = await satori(
    {
      type: 'h1',
      props: {
        children: 'Hello world',
        style: { fontWeight: 'bold' },
      },
    },
    {
      width: 1200,
      height: 630,
      fonts: [{ name: 'Roboto', data: robotoFont }],
    }
  );
  const png = await sharp(Buffer.from(svg)).png().toBuffer();
  return new Response(png, {
    headers: { 'Content-Type': 'image/png' },
  });
};GETis a special function name in Astro that makes a get request- You have to provide a font using
fsreadFile function - Generate
svgusing the satori lib (as the highlighted code above) - Convert svg to
pngusing sharp lib - Return a response of content type
image/pngand return the png file
Note that the created image will be named after the file name, so if you name it
og.png.tsthe created file will be in the same path under the nameog.png
3. Reference the created images in meta tags
If you have layout or a Meta component, reference the created image as an og:image in meta tag as follow:
<meta property="og:image" content="/blog/og.png" />The above like in the header element will make this image the social card when you share that page.
4. Design the card
If you have different pages that you would like to create different customized og images, you may create a utility with the common parts, and the part that you send to Satori is the one that will always change. From the code shared above, I am interested in this part:
...
const svg = await satori({
  type: 'h1',
  props: {
    children: 'Hello world',
    style: { fontWeight: 'bold' },
  },
},
...
The highlighted part is the one that will change always based on what you would like your card to look like, and remember it is here a JSX form of a react component as satori doesn’t support the declarative way yet.
You can always fetch the post title and link or maybe the author name and photo as I did, adding them to the template will generate a customized one automatically every time you change the title of the post a new card will be generated in your next build with the new information.
5. Testing
After setting it up, you can always check weather the og:image has been created correctly by checking the output directory in your framework which is dist in my Astro project, find the created image in the same path and see whether it is created correctly or not.
I suggest to create the card first as a react component (declarative), design it and test it in browser, then convert it to the JSX form.
After all is good, if you would like to test your image for all social media websites, you can easily use this website metatags.io 🔗 which gives you a very close view to how your website would look like on Google Search, X (Twitter), Facebook, Slack, Linkedin, and more.
Alternative to use satori and sharp directly
Vercel introduced satori but also served its users with an edge for serving images and caching them, and provided an easier way to generate images which abstracts some parts of the process above using a lib called @vercel/og 🔗, feel free to try it out, it is free to use and can be downloaded as well using an npm package
npm install @vercel/og
# or
yarn add @vercel/og
more about how to use it is on their website 🔗. If you face any problems implementing that yourself, feel free to reach out to me on X (Twitter) 🔗